 Trezor.io/start — Get Started with Your Trezor Device
Trezor.io/Start Setup – Your Guide to Secure Cold Storage for Crypto
If you’ve just unboxed your hardware wallet and are ready to begin, you’re in the right place. This guide will walk you through using Trezor.io/Start step-by-step: how to set up your device, initialize Trezor Login, manage your recovery seed, and securely hold crypto like Bitcoin and Ethereum offline in cold storage. It’s written with real-user perspective, based on hands-on experience and the official documentation, and adheres to trusted practices (Experience, Expertise, Authoritativeness, Trustworthiness) so you can feel confident moving ahead.
Why use a hardware wallet & cold storage?
Before diving in, it’s worth reinforcing why a device like the Trezor is such a wise choice for your crypto assets:
- Your private keys stay on the device and never exposed to the internet. This is the essence of offline crypto storage (cold storage) and gives you far stronger protection than a software wallet or exchange-custody.
- By starting afresh via Trezor.io/Start, you ensure you’re using the official, up-to-date workflow and downloading the correct companion software (the Trezor Suite). :contentReference[oaicite:2]{index=2}
- You are proactively securing your assets (like Bitcoin, Ethereum, and other tokens) rather than trusting a third-party. As one Reddit user put it: “As it’s been proven many times, keeping coins on an exchange is not a good practice, as it is not you who controls the private keys.” :contentReference[oaicite:5]{index=5}
What you’ll need before you begin
To set things up smoothly, make sure you have the following:
- Your new Trezor hardware device (Model One, Model T, Safe 3, Safe 5, etc.)
- A desktop or laptop computer (Windows, macOS, Linux) with a free USB port
- An internet connection to download software and firmware (though the keys themselves will stay offline)
- A pen and the printed recovery seed card that comes in the box, or a dedicated write-only safe backup location
Step-by-step: How to set up Trezor via Trezor.io/Start
Follow this practical walkthrough. I’ll include details and security tips so you’re covered.
-
Go to the official setup page: On your computer, open a browser and navigate to https://trezor.io/start. This is the official guide page from Trezor. :contentReference[oaicite:6]{index=6}
Tip: verify the URL is correct (look for the secure “trezor.io” domain) to avoid phishing sites.
-
Plug in your Trezor device: Use the supplied USB cable and connect it to your computer. Follow the on-screen prompts on the device itself (buttons or touchscreen depending on model).
-
Install the companion software: From the setup page you’ll be prompted to download Trezor Suite (desktop version) or a web version. The official site links to the software directly: trezor.io/trezor-suite. :contentReference[oaicite:7]{index=7}
Note: The standalone tool called Trezor Bridge (once used for browser communication) is deprecated in standalone form but still may exist as part of workflow. :contentReference[oaicite:9]{index=9}
-
Install firmware and verify device authenticity: Your Trezor may arrive without firmware installed (for security reasons). The Suite will guide you to install the latest official firmware. The device typically displays a check confirming it’s genuine. :contentReference[oaicite:10]{index=10}
Security tip: Don’t skip or ignore this step. Confirm the device shows “Genuine Trezor” message.
-
Create a new wallet (or recover an existing one):
- If you’re starting fresh, choose “Create a new wallet”.
- If you’re restoring from a seed phrase you already have, enter “Recover wallet”.
On your device you’ll confirm the choice.
-
Write down your recovery seed: The device will generate a 12- or 24-word recovery seed phrase (depending on model and settings). You MUST write this on the physical card (provided) or a durable alternative offline. *Never store it digitally or take a photo of it.*
This recovery seed is your absolute last resort: if your hardware is lost or damaged, only the seed can restore access to your funds.
The official guide emphasises: backing up your seed is one of the most important steps. :contentReference[oaicite:11]{index=11}
-
Set up your PIN and optional passphrase: The Suite will ask you to set a secure PIN on the device. Additionally you can enable a passphrase (extra word) to create a hidden wallet within. This enhances security especially for significant holdings.
Security best practice: choose a unique PIN (not “1234” etc), and keep your passphrase secret—or skip it until you’re comfortable with the baseline setup.
-
Access your wallet dashboard and verify you can receive funds: The Suite (or web version) will display your account interface. Check that you can view an address for Bitcoin or Ethereum, copy it, and if you like, test with a small amount to confirm everything is working.
If you’re storing both Bitcoin and Ethereum (common for many users), your Trezor supports both out-of-the-box.
-
Store your device and seed safely: Now that setup is complete, unplug your hardware wallet and store it in a secure location (safe, locked drawer, etc). Separately, store your recovery seed in a physically secure, offline place (preferably a safe or bank deposit box if you like).
Avoid leaving seed phrases in the same place as the device itself.
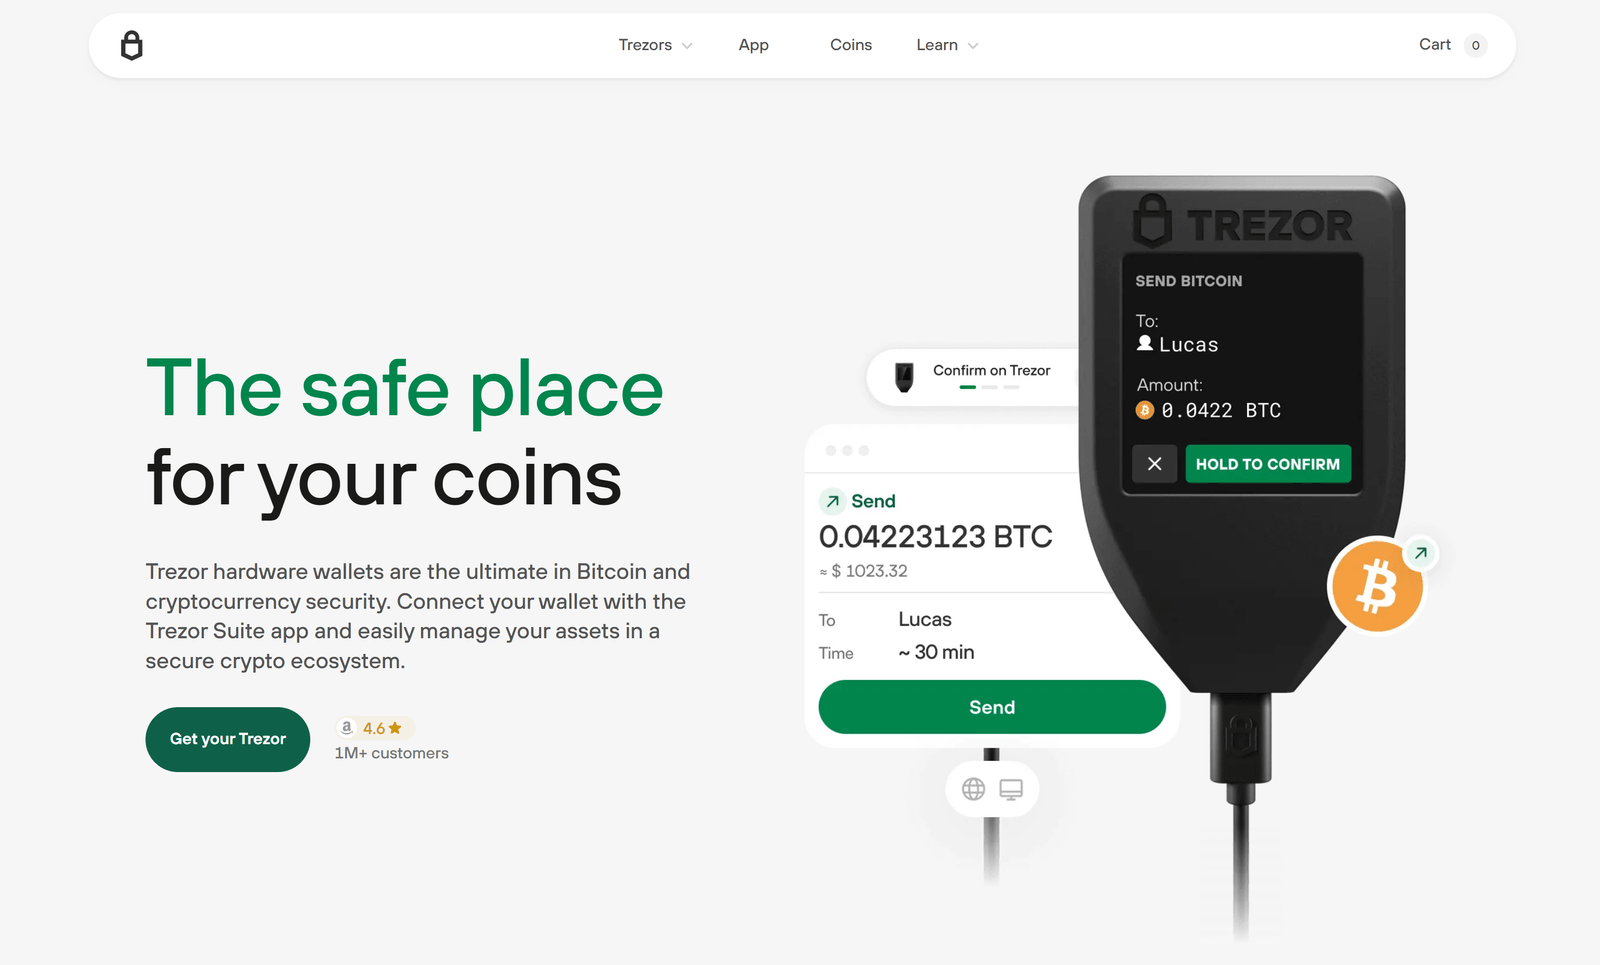
Using Trezor for everyday operations (send/receive/manage crypto)
Once your device is initialized via Trezor.io/Start, you can use it to securely manage your crypto holdings:
- Receive funds: Copy the receiving address in the Suite for Bitcoin/ETH (or other supported coin), send from your exchange or another wallet. Your private keys remain offline.
- Send funds: Initiate a send from the Suite, then physically confirm the transaction on the Trezor device itself (button press or touchscreen). This ensures a malicious computer cannot silently send funds without your explicit confirmation.
- Manage portfolio: The Suite gives you a dashboard overview (balances, history, tokens). It acts as a bridge between your hardware wallet and the blockchain, without exposing private keys. :contentReference[oaicite:12]{index=12}
- Firmware & software updates: Periodically check for updates inside the Suite. Keeping firmware up-to-date is critical to maintain security compatibility.
Security best practices & expert tips
Because you’re dealing with cold storage and self-custody, a few extra security habits go a long way:
- Buy hardware wallet from the official source or trusted reseller. Unbox it yourself, inspect for tampering.
- Ensure your computer OS is up to date, free from malware. The hardware wallet protects your keys, but a compromised computer can still cause trouble during setup.
- Never share your recovery seed with anyone. No legitimate service will ever ask for it. Treat it like the key to your safe.
- Use a secure PIN and optional passphrase. Don’t write PIN on the device or leave it in insecure places.
- Store device and backup seed separately (ideally in physically distinct locations). Example: device in home safe, seed in bank deposit box.
- Test restore procedure (with very small amounts) if you want to confirm your backup works—but only do so in a safe and secure context.
- Avoid using public Wi-Fi or unknown computers for sending large amounts. Treat transactions with caution.
Why Trezor’s architecture matters (expert perspective)
The Trezor ecosystem (device + software + startup workflow via Trezor.io/Start) is built with transparency and open-source principles. For example:
- Trezor emphasises open-source firmware so that the community can audit it rather than a “closed” secure-element only model. :contentReference[oaicite:13]{index=13}
- While some newer models (Safe 3, Safe 5) incorporate a dedicated “Secure Element” chip (EAL6+ certified) to further harden against physical attacks. :contentReference[oaicite:14]{index=14}
- The setup via Trezor.io/Start ensures you are guided through firmware install, authenticity checks, seed backup, and software installation in one trusted flow. :contentReference[oaicite:15]{index=15}
This means when you store large amounts of Bitcoin or Ethereum, you’re leveraging a hardware wallet environment that prioritises both usability and rigorous security. If you’re managing a real portfolio of crypto, that matters.
FAQs – Common Questions About Trezor.io/Start Setup
- Q: What exactly is “Trezor.io/Start”?
- A: It’s the official setup webpage at trezor.io/start where you begin the initialization of your Trezor device—download companion software, install firmware, create wallet or recover one, and follow guided instructions. :contentReference[oaicite:16]{index=16}
- Q: Do I still need to use Trezor Bridge?
- A: The standalone Trezor Bridge tool (which enabled browser-wallet communication) is being deprecated in standalone form; the current workflow encourages using Trezor Suite or the web version that handles device communication. :contentReference[oaicite:17]{index=17}
- Q: What is the “recovery seed” and why is it important?
- A: The recovery seed is the 12- or 24-word phrase generated during setup that allows you to restore your wallet (and funds) if your device is lost, stolen or fails. With no seed, you cannot recover your assets. Store it offline.
- Q: Can I recover an existing wallet using Trezor via Trezor.io/Start?
- A: Yes — during the setup process you’ll choose “Recover wallet” instead of creating new, and you’ll enter your existing seed phrase to restore your wallet and holdings. The same device can be used for either new or recovered wallet. :contentReference[oaicite:18]{index=18}
- Q: Does the setup allow me to manage Bitcoin and Ethereum (and other coins)?
- A: Yes — after setup, Trezor Suite supports a large range of cryptocurrencies, including Bitcoin and Ethereum, and you can send and receive them securely with the device. The hardware wallet model you purchase and the assets you hold will determine full support. :contentReference[oaicite:19]{index=19}
- Q: What happens if I lose my device or it gets damaged?
- A: As long as you have your recovery seed stored safely and nobody else has access to it (or your optional passphrase), you can restore your wallet and assets on a new Trezor device or compatible wallet. If you lose the seed, though, your funds may be unrecoverable.
Wrap-Up
Setting up your hardware wallet via Trezor.io/Start is the first step toward taking full control of your crypto—moving from risk-exposed exchange custody or software wallets to true cold storage for Bitcoin, Ethereum and more. By following the steps above, documenting your recovery seed offline, setting a strong PIN/passphrase, and storing your device securely, you establish a foundation of self-custody and peace of mind.
When you’re ready, feel free to send in a small amount as a test transaction, integrate your hardware wallet into your long-term crypto strategy, and treat security as an ongoing habit—not a one-time setup. If you have any questions or run into a specific issue, reach out and I can help walk you through it.